Basic Review of Ebelskivers
First of all we want to apologize to all of you for our lack of posting last month, we also want to send a HUGE thank you to John for keeping things going. Tiffany and I got married last month and it had taken a lot of our free time and unfortunately Lukewarm Legumes suffered. The great news is we are happily married and have a lot of great posts just waiting to be composed! Now to your regularly scheduled post about Ebelskivers.
I first heard of Ebelskivers in 2009 from Food Networks “The Best Thing I Ever Ate” series. Celebrity Chef Aaron Sanchez raved about this delectable little stuffed breakfast style pastries from Denmark. I’ve wanted to try them or make them ever since, and recently that dream had become a reality. Tiffany and I were out shopping and stumbled into Williams Sonoma, and picked up their Nordic Ware Ebelskiver Pan while a little pricey it’s a very well constructed pan. My only complaint would be the design is not favorable for glass top ranges, which is what we have. That said, as long as you are careful then I don’t think it’s a huge concern, but don’t come complaining to me if you scratch your glass cooktop. This is more of a stationary pan, bring it up to temperature and leave it there, the only time it is moved is when you are removing the finished ebelskivers and returning it to the stove.
Before we jump too far ahead we want it to be known that we really enjoy ebelskivers and this is the first of a few posts you’ll see on the topic. We’ve only made them 6 or so times now and all have been sweet, we have yet to gravitate towards the savory, but we will eventually!
The basic ebelskiver batter we use is very similar to pancake batter.
1 cup all-purpose flour
1 1/2 teaspoon(s) Sugar
1/2 teaspoon(s) Baking powder
1/4 teaspoon(s) Salt
2 whole(s) Eggs Separated
1 cup(s) Milk
2 tablespoon(s) Butter Melted and slightly cooled
Combine the dry ingredients, in separate bowl whisk together egg yolks, milk and butter, then combine with the dry ingredients – the batter will be lumpy.
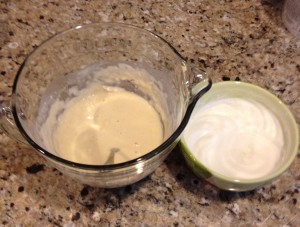
Here is a picture of batter before folding in the beaten egg whites – please note this is a half batch.
Whip the egg whites until stiff, fold in 1/3 at a time.
That’s it!
We typically add an extract to our batter, we’ve enjoyed coconut extract and vanilla extract but your creativity in balancing the filling to the batter is totally in your hands. If you’re planning on a savory Ebelskiver then don’t use any extracts.
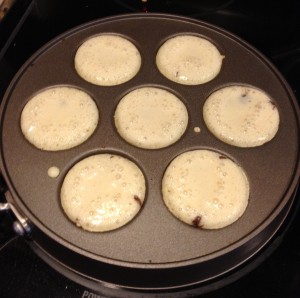
Next comes the cooking part, different people have different techniques but what I’ve found works best is to heat the pan to a med-low heat, have your filling ready, use a nonstick cooking spray or butter in the pan and then spoon in a generous tablespoon of batter into all of the ebelskiver openings. I’ve found it’s much better to under fill with batter than over fill, remember when you add your filling it displaces batter and fills up the rest of the cup. Once the batter is in the pan quickly get your fillings into as close to the center of the batter as you can. If you find you’re rushing too much turn the heat down a little. As I mentioned before it’s much easier to have them a little on the small side than overly huge, however, as you’ll see in the image below the cups do fill up when you add the fillings.
Another little trick I’ve been using since our first batch is that once the fillings are in I use my finger and kind of push the filling down and make sure it’s covered with batter. The reason I do this is it typically produces an ebelskiver that is less likely to leak. The image above is a cherry and chocolate sauce in coconut extract infused batter.
You’ll notice some bubbles when they are cooking, unlike with regular pancakes this is not an indication that they are ready to turn, even when the bubbles remain. This just takes a little practice but after your first pan full you’ll have it down.
They sell a pair of sticks to flip/turn ebelskivers at Williams Sonoma for $13, we opted to just use wood skewers, the kind you use for grilling. We also tried a high temperature slim silicon spatula and it didn’t work at all! To flip them all you do is gently poke along one side and they should sort of start turning on their own, carefully help it make the complete flip and if you’ve over filled them gently, and carefully squish them into the pan. You’ll know what I’m talking about if you do it, if you over fill them this is where it will become a problem. When you try to flip an over filled ebelskiver it doesn’t fit back into the pan, the baking soda reacts and they grow when cooked. If you do this and don’t squish them into the pan you end up with a most likely leaking ebelskiver that resembles a mushroom – they still taste great but it’s not a great demonstration of the technique used create what should be a uniform and sealed ebelskiver.
I typically plan for a single turn, that’s not to say you can’t flip them back over if you think they need more cooking but it shouldn’t be necessary if you are patient enough. The finished product looks like what you see below.
You’ll notice some of these leaked and there is some uneven cooking, this was 100% my fault, this batch is one of our very first batches and we’ve gotten a lot better. You can dip them in syrup, eat them as is, dust them with powdered sugar, whatever you feel is appropriate.
As I mentioned earlier we have become a big fan of these and we will follow up with additional posts on our success and failures (there have been a few), in the mean time we strongly suggest giving these tasty little stuffed pancakes a shot!


Follow Us!