Archive / Ingredients

RSS feed for this section

Articles about the things that go in your food.

Grass Fed Beef

There has been enormous discussions about Grass Fed Beef these days, what is it, why do folks like it, and in general what’s different from “regular” beef. Let’s start at the back end of this and work forwards.

Cattle will graze (eat) many things that will help them grow, remain healthy, and ultimately turns into fat/muscle which is what we eat. Much like humans, we need to eat food to live, grow, and stay healthy – not too surprising. Mass produced beef will be fed many unpleasant things, filled with hormones and antibiotics all to get more “yield” from the cattle. Yield is the percentage of meat they get from a cow. Higher yield = higher profits. The unpleasant things can range from pesticide laden fields, corn, grain, and even other animals and animal byproducts. The theory behind grass fed beef is that it’s a healthier way for a cow to eat and grow, but comes at the expense of less fat and as a result higher cost. If you buy bargain beef, $2.99/lbs beef is most surely quite poor quality, the animals are treated incredibly poorly (which is a discussion for another time), fed literally anything that is cheap, and when processed they put whatever meat filler they can to get maximum yield. You’re savings comes at a cost, to the animals and to what you’re eating.

More premium beef is fed grain/corn, or some other full vegetarian diet, no hormones or antibiotics are used to manipulate the animals to create more meat than they naturally would. While taking yet another step in the healthier direction comes grass fed beef. Which is fed a diet exclusively of grass, sometimes referred to as pasture fed. Some of the bargain beef is “grass fed” but not exclusively, so if you want the full grass fed beef experience and benefits you’ll want to find beef that is 100% grass fed and finished, meaning the last few weeks of the cattle’s life it continues to eat a diet of exclusively grass. There is some debate how this affects the final product, some feel finishing with corn is the best of both worlds, but we are focusing on grass fed beef today.

The benefits to you of eating grass fed beef is that it’s not just lower in fat than other methods of feeding cattle, but the fat that is there is much healthier. Which is why grass fed butter is so popular these days as well. But now you’re wondering if it’s worth it, as fat is where the famous beef flavor comes from, this is the same concern I had. Admittedly I put off trying grass fed beef for a long time because of this. I’m an old-school rib-eye guy, so I really like the classic beef flavor. The answer is difficult, but worth exploring. It really depends what is important to you, if healthier options are important then absolutely give it a try, if you’re looking on a small twist on beef give it a try, if you’re simply curious try it, if you are only driven by the price then it’s probably not worth it, if you want a steak with USDA Prime quality marbling grass fed beef is not for you. For me, if I feel like a steak or burger, but want to be healthier and feel better about what I’m eating then it’s a total winner. If I’m looking for that classic beef flavor, I’d probably lean towards a USDA Choice or Prime, or dry aged steak, preferrably corn fed or finished.

To dispell some of the myths about grass fed beef, it is NOT tough, it is not dry, it does not taste funny, and while cooking is important I feel that’s true of every cut of beef. Below are some pictures of a 100% grass fed top sirloin I made. grass-fed-beef  

grass-fed-beef-cut

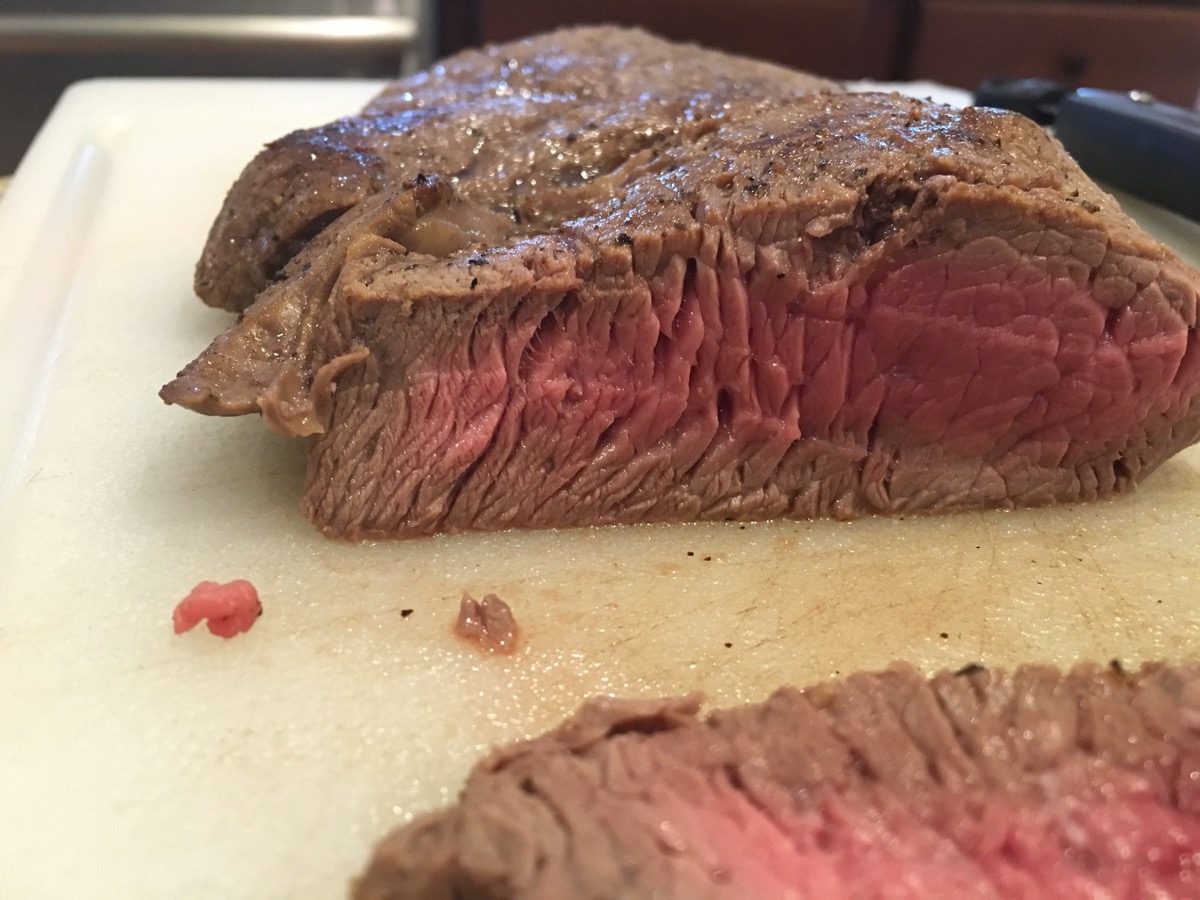
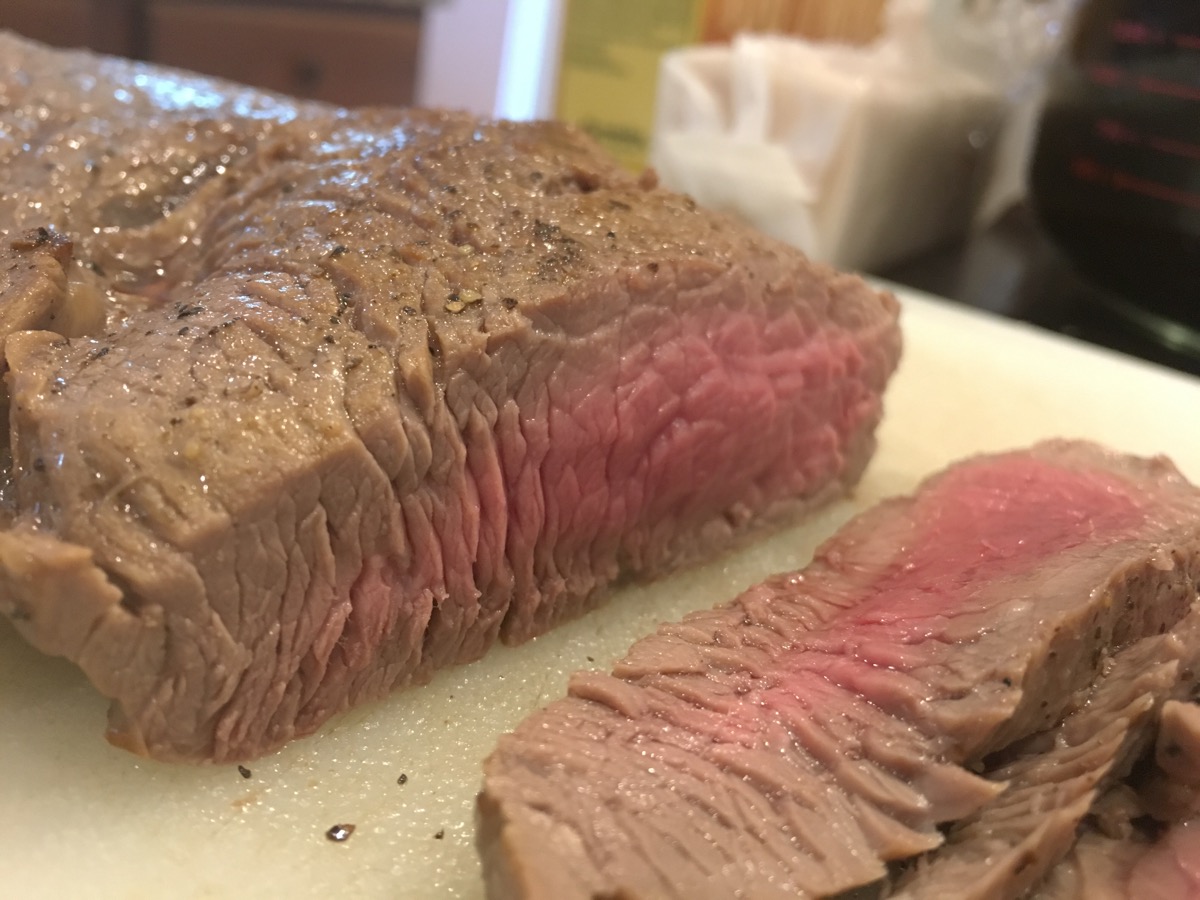
Trying to capture the purest beef flavor I went for a very minimal amount of seasoning.  It was simply seared on a medium-high temperature in a cast iron skillet for about 2-3 minutes per side.  I lightly salt and peppered the room temperature steak just prior to cooking and had a light coating of canola oil in the pan.  After cooking I let it rest for about 10 minutes on a foil tented cutting board.  As you can see this grass fed beef is was extremely tender and juicy.  Top Sirloin is a great universal cut in that it’s not super fatty like a rib-eye, it’s kind of a cross between a filet mignon and a NY Strip, and typically at a much lower price than either!  Even with a leaner cut this steak was melt in your mouth tender, with plenty of natural juices for flavor.

As for the flavor, it really didn’t taste much different than a regular steak, it was maybe a drop leaner, but it still had that classic beef flavor with no off or funny flavors.  I’ve tried several cuts of grass fed beef, and with the exception of a grossly overcooked ribeye (sorry ribeye, that was entirely my fault) they were all as you would expect, a premium tasting steak.  I will warn you, you cannot shop with your eyes like you do for other steaks, this top sirloin looked very boring raw, I wish I snapped a picture!  But the finished product was great.

I highly recommend trying grass fed beef if you haven’t already, with no more attention than you’d show any other cut of beef you can have a healthier option and still satisfy that craving for meat.  With all of that said, if I knew I was going to have one final steak in my life, I’d opt for a USDA Prime, corn finished rib eye, there is a creaminess to the beef from the high fat content that I’ve yet to experience with a grass fed steak.


Chocolate Pretzel Buttons

Ever since the first bite of a chocolate covered pretzel, I have been in love!  These simple, yet nice looking chocolate covered pretzels are actually fairly quick and easy to make.  They also, are very versatile.  By buying themed M&Ms for whichever holiday it may be, or by going to their website and making special ones with your initials, baby’s name etc, you can personalize these treats for any event.

Cherry Thumbprint cookies and Chocolate Pretzel Buttons

Cherry Thumbprint cookies and Chocolate Pretzel Buttons

Ingredients:

2 bags of Hershey’s Hugs

1 bag of Snyder’s of Hanover Pretzels,  Butter snap

1 large bag of M&Ms Milk Chocolate Candy’s


  1. Turn oven to 200 degrees.
  2. Cover a baking sheet or cookie sheet in parchment paper.
  3. Unwrap all the Hershey’s Hugs and set them aside in a bowl.
  4. Lay out the pretzels one layer deep over the parchment paper on the baking sheet.
  5. Place a hug in the center of each pretzel.

    Hugs on Pretzels

    Hugs on Pretzels

  6. Place baking sheet with the pretzels and hugs into the oven for about 5 minutes.  You just want to melt the chocolate enough without them oozing all over.  You will see the hugs looking shiny and just starting to lose shape.  This is when you want to pull them out of the oven.
  7. Immediately after removing the pretzels and hugs from the oven, you want to carefully press an M&M into the center of each hug.  This is the most time consuming part and where you need to be most careful.
  8. Let your buttons cool for 15-20 minutes and then you can enjoy a fun snack!

    Chocolate Pretzel Buttons

    Chocolate Pretzel Buttons

Tuna Noodle Casserole with Parmesan Base

Ingredients:

2 cups egg noodles

2 cup milk

1 cup heavy cream

1/2 stick butter

2 oz cream cheese

1 cup peas

1 cup parmesan cheese grated

1 can albacore tunafish drained

(Optional: instead of 1 cup peas, you can do 1/2 cup of peas and a 1/2 cup of diced carrots)

Makes two servings.

First off, I have to admit that I had an absolute love for Betty Crocker’s classic tuna noodle growing up.  It was my favorite food that I always got on my birthday, and was easy for me to make myself as a teenager.  Then, after years of this addiction, they changed their recipe.  I was pretty sad about that, and turned to hard copies and virtual copies of tuna noodle recipes to get that same flavor.  However, I quickly realized that practically every recipe I ran into called for cream of chicken or cream of mushroom soup.  This never created the same taste as I remembered my favorite meal having.  Thus, my own version of what I thought a tuna noodle casserole should taste like.  I think the secret is in making an alfredo sauce instead of using the condensed soup route (not that that is a bad thing, but it wasn’t the flavor I was looking for).

Tuna Noodle Base

Tuna Noodle Base


To start this recipe, we begin with the milk, heavy cream, butter, and cream cheese in a sauce pan.  Bring to almost a light boil while whisking to help dissolve the cream cheese.


Noodles, peas, and tuna fish

Noodles, peas, and tuna fish


Once the cream cheese is blended and the liquid contents are almost to a boil, add the egg noodles, peas, and tuna fish.  Cook until your noodles are el dente by covering the saucepan with a lid, and turning the heat down to simmer for about 10-15 minutes.


Lastly, remove the saucepan from the heat and add the parmesan cheese.  Use your whisk to mix in the cheese.  It is important to not add the parmesan cheese too early because the cheese will curd instead of being a smooth texture.  You may get tuna fish, noodles, and peas in the whisk while doing this.  That is okay.  You can give your whisk a tap on the side of your saucepan and they will fall right out of your whisk.

image-4

Added in the parmesan

Now, it’s time to enjoy the fruits of your labor.  If you’d like, you can sprinkle a little more parmesan on your portion of tuna noodle casserole before serving.

image-6

Enjoy!


I hope you enjoyed my version of a classical tasting Betty Crocker tuna noodle. 🙂

Recipe Review – Star Anise Cookies in “The Illustrated Cook’s Book of Ingredients.”

I have long been fascinated with the spice called “Star Anise.” It is used primarily in Asian cuisine but also in Malay, Indian, Pakistani, and Vietnamese. It is a recent newcomer to the West with a flavor like that of Anise, although they are unrelated plants.

Star Anise

Recently having purchased some Star Anise I have been looking for a dish I could use it in. Today, while browsing through a new book, I was reading the section about Star Anise and it had a recipe for cookies made with this spice. The recipe is simple and so I could not resist.

Illustrated Cook's Book of Ingredients

The recipe is from the book “The Illustrated Cook’s Book of Ingredients” which was given to me as a gift.

I liked the results and so am sharing them with you here. Two things however, I will change with the next batch I make will be to reduce the baking temperature to 350 degrees because the cookies baked a little bit too much even with checking and rotating at 5 minutes and taking them out at 10.  I will also increase the amount of Star Anise in the dish because I find this amount providing too subtle a flavor. I would like to taste more of the Star Anise flavoring in the cookie.

Here is the recipe:

STAR ANISE COOKIES

Ingredients
8 Star Anise Seeds

1 c Self Rising Flour*
1 t Baking Powder
1/4 c Brown Sugar

4 T Honey
7 T Butter, melted

Instructions
Preheat oven to 375 degrees.

Star Anise ready for grinding

Remove seeds from pods and finely grind in a spice grinder or with a mortar and pestle.

Star Anise seeds

Combine flour, baking powder, and brown sugar with ground Star Anise seeds. Stir in the honey and then the butter. Mix well until smooth.

Lightly grease a baking sheet (or two) or line with parchment paper. Drop cookie dough by teaspoonfuls onto the baking sheet, lightly pressing with your hand keeping 2 inches between to allow for spreading.

Star Anise Cookies ready for baking

Bake for 10-15 minutes, or until just beginning to turn golden. The cookies may still be a little soft when they come out of the oven, but will become crisper as they cool.

Star Anise Cookies

These are good served with a glass of dessert wine.

* I did not have self-rising flour on hand so I substituted with 1 c flour, 1 1/2 t Baking Powder, and 1/2 t Salt.