Archive / Posts by Tim

RSS feed for this section

All posts by Tim

New Comments Function

Hello Visitors,  This is a simple update to make you aware of an improvement we made to our site.  We are now utilizing Disqus for our comments, this allows users a much simpler and more interactive way to comment on our blog.  You can now post without entering an email address or name, simply post from a browser that you are logged any of the following accounts Facebook, Twitter, Yahoo, Google, OpenID or  your own Disqus account.  Your post will show as a signed by which ever account you select after you enter it.

We did this to create a simpler way for visitors to comment and make the experience more social, hopefully easier and engaging.  We’ll be updating the site as we find additions worth adding, if you have any suggestions just let us know and we’ll do our best to make it a reality.  We are committed to continually evolving this site to make it the best possible experience it can be.

Simple Stovetop Croutons

Anyone who knows me knows that I hate waste, in particular with food, it really drives me crazy to see food thrown away.  In light of this I’ll do almost anything to use a product before it goes bad.  A quick side anecdote, I once pulled a turkey burger out of the trash and ate it, in my defense it was only thrown away 10 minutes earlier and it was sealed in a ziplock bag – it was delicious!  I’m not saying eat bad food, or take chances, but try to schedule your left overs so you don’t throw them away, not only is it wasteful of the products it’s also very expensive.

So fast forward to now, I was at my parents house and they had some bread that was sitting on the counter waiting to be thrown out.  It looked like a quality bread and they were making dinner and we were starting our meal with a salad.  I instantly thought, let’s see how quick I can make croutons and use this bread.  First, I closely inspected to make sure the bread wasn’t bad, after it passed that inspection I asked my mother to cut the bread, she chose to cut them in none uniform pieces, which worked remarkably well.

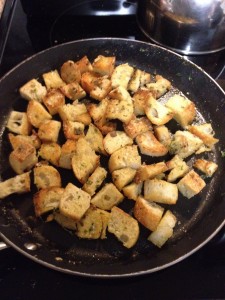
Meanwhile I grabbed a non-stick skillet and got it on the stove at a medium high heat.  By the time the pan was hot the cut up bread was ready, I added a generous layer of olive oil (extra virgin olive oil) and started transforming the boring, stale soon to be wasted bread into a nice addition to our salad.  As they were cooking I seasoned them with salt, pepper, garlic powder and a little parsley for color.  I would then toss them as it seemed necessary adding additional olive oil as they looked dry.  It took a few minutes but they started to lightly brown up and at that time I added fresh grated pecorino cheese (which is very similar to parmesan, but it’s made with ewe’s milk rather than cow’s milk).  See the action shot below!

stovetop croutons

As you can see they are all sizes and shapes, I was initially turned off by this but it worked out really well.  By having varying sizes we had various levels of crunch with the finished croutons which was very enjoyable.  They ranged from very crunchy to slightly chewy still, I thought it was a very enjoyable combination.

These were incredibly simple to make and made an average salad seem like something special, the best part is they took maybe 10 minutes total to prep and cook – not a bad use of time!  They were a quantum leap better than store bought croutons, these simple quick croutons were in the top 5 I’ve ever had in my life.  If you’re looking to bring new life to a salad or you have some bread going bad it’s a great way to use it and enjoy it!

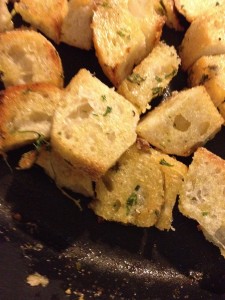
Below is a closeup of the croutons just before I pulled them out of the pan, just seeing this picture makes me smile, they were that yummy.

croutons

Let me know if you have any crouton ideas or recipes you think are worth trying.

Homemade Corned Beef

As I have mentioned before the bulk of my interest in food comes from my parents, this post is one of their traditions that I tried to capture and share with everyone.  This tradition is a something that developed a few years ago and we’ve been doing every year since.  My family really enjoys corned beef, we also noticed that corned beef’s seemed to be of lower quality year after year, they just weren’t how they used to make them.  So we set out to create corned beef’s that reminded us of the corned beef’s of yesterday, but first a little history on the nobel corned beef.

Before we jumped blindly into this project we were curious on the history of corned beef, so we could better understand the tradition and even the scheduling of when and why they were made.  One of the first things we learned is the exact origins of corned beef has been lost, but it is generally agreed that it was done to preserve the meat and make less desirable cuts of beef more tender and flavorful.  A few hundred years ago there were no refrigerators and if you had to travel or survive a winter when your food supply migrated away from you, you had to find a way to survive.  If you’re optimistic and you or your tribe were extremely successful with hunting you’d want to preserve as much of the meat as possible, creating corned beef would be a great way to do this.

The next is the scheduling, why is it that the majority of American’s who eat corned beef eat it in March?  In most of North America March is the end or near end of winter, in order to make corned beef you need to be able to store the meat in a cold temperature for a long period of time.  Even in this day and age not many people have walk in refrigerators in their homes so that means leaving it in a garage or outside.  The main thing to do is keep the meat as close to 45 degrees F as you can for 10-21 days (different recipes call for different lengths of time, some go for much longer than 21 days).  During this time period you need to make sure the meat stays submerged in the brine and it’s generally recommended to give it a stir once a day.

So what is corned beef?  Corned beef is brined beef, typically brisket of beef.  The brining not only adds flavor, but it also tenderizes the meat and changes it’s color.  Brine is in it’s simplest form a pickling liquid which is made from water, salt, sugar and seasonings.  You probably see where this is going now, in order to make corned beef all you do is create the brine, chill it, place the beef in the brine, keep it cool for a few weeks while stirring once a day, ensuring the beef is submerged and then you have corned beef.  The theory is very simple, making all of these items come together in a way that resembles corned beef is a little trickier.

The exact recipe for the brine we use I do not have, Alton Brown has a good basic recipe for you to start with, after that batch you can start tweaking the ingredients to suit your needs.  One of the tricky items to find is Saltpeter, which absolutely must be used when making corned beef.  In addition to adding preservation to the meat it is responsible for the pink hue of the meat which is a staple of corned beef.  The ratio of seasonings, salts and sugar you use varied depending on the size of the batch you’re making.  It seems every year we make a larger and larger batch which is another reason I don’t know our ratio’s.

We start by grinding pickling seasoning, along with black peppercorns and other seasonings using a mortar and pestle.
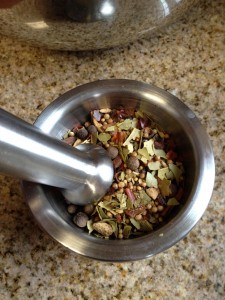
Grinding Pickling Seasoning

Then we add them to the brining liquid which we are heating on the stove to help aid in dissolving the salts and sugar.
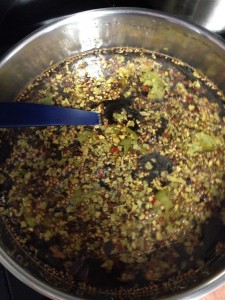
cooking corned beef brine

This is a catch 22 because as soon as everything is dissolved adequately we have to cool it, there is no simple or easy way to cool a lot of water so we just add ice until the temperature is correct.
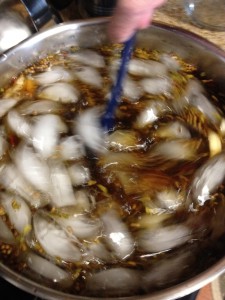
cooling corned beef brine

Once the brine is brought down to 45 degrees F we then add it to our brining vessel and the brining of the corned beef’s begins!
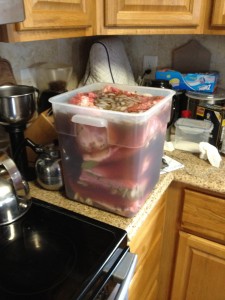
corned beef in container to be aged

Now we hurry up and wait 🙁 After several years of testing we’ve found that 3 weeks is the sweet spot for us. I cannot stress the importance of keeping them chilled, if you let the temperature increase even a little bit you run a risk of having bacteria enter the equation and the beef discoloring – which happened to us last year.  The outside of the meat turned gray but the inside was still an inspiring hue of corned beef deliciousness.  We ran into the problem because my family moved from NY to NC and winters down here just aren’t as cold so we had to get a cooler to keep our corned beef’s in with ice around it to keep it the right temperature.

After 3 weeks of daily checks and adding ice approximately every 3 days we are ready!  I present you with fresh, just out of the brine corned beef’s!
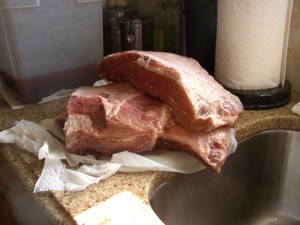
finished corned beef

We went a little crazy this year so we ended up using a vacuum sealer and plan on freezing the majority of the corned beef’s this year so we’ll have them throughout the year.  Here is the full harvest on my parents stove.
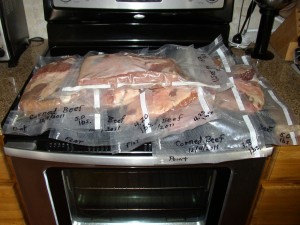
vacuum packed corned beef

We had our first one about 2 weeks ago now and I think this may have been the best batch to date.  The first year they were a little heavy on the garlic and cloves,  then we adjusted on the second year and they came out very good, last year we ran into the discoloration problem, but this year they are spectacular.

Cooking the corned beef’s is about as simple as it gets, simmer it for 2.5-3 (or longer depending on the size) hours and serve with your favorite corned beef sides!  Some people like to add seasonings such as cloves, carrots or other seasonings or aromatics to the braising liquid, we find ours to be so flavorful it’s just not needed.  Great leftovers, or as corned beef sandwich’s – how ever you like your corned beef this is the only way to go.

Below is an image of the first corned beef that we cooked – delicious!
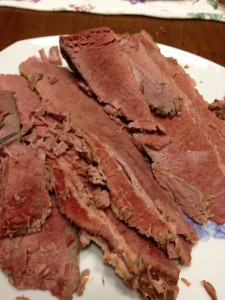
cooked corned beef

Down Home Punch Made at Home

Jack Daniels makes a number of bottled beverages and one of them is called Down Home Punch, Tiffany happens to be a big fan of this which created a little bit of a problem when she moved from Virginia to live with me in North Carolina, it’s not sold here!  The other “problem” is this is a pricier bottled beverage, it typically would run about $7.99 + tax for a 6 pack, which at face value isn’t terrible, but the bottles are only 10.5 oz. rather than the far more typical 12 oz bottle.  We thought about importing it from Virginia when we were up there, but we were concerned with the legality of the whole enterprise.  That meant that she could only have her favorite bottled beverage when we were in Virginia, to me that seemed a crying shame, so I learned how to make it.

The benefits of making it yourself are pretty obvious, first of all you can tailor it to your specific liking, like it sweeter? add an extra dash of Grenadine, like it Peachier? add a little more peach schnapps, and a few other tips I’ll share with you in just a minute.  The basic formula for Jack Daniels Down Home Punch goes as follows:

  • 1 part Jack Daniels whiskey
  • 1 part Peach Schnapps
  • 1 part Sour Mix
  • 2 parts Orange Juice
  • 1 dash Grenadine
  • 1 part Lemon Lime soda – such as 7up or Sprite

Assembling the drink seems intimidating at first glance but once you’ve done it a time or two it’s a breeze.  Combine all of the ingredients in a cocktail shaker  full of ice with the exception of the soda (as a rule you never shake soda when making a drink because it will remove the fizz), shake vigorously and then pour it in a glass with ice and the lemon lime soda.

It’s actually not cheaper to make this drink yourself, I was kind of surprised when I did the math, the bottled beverage runs about $0.14/ounce and making it yourself runs about $0.15/ounce it’s close but not quite cheaper.  If you lived in a state that had really cheap liquor, North Carolina does not fall in that category, you can probably drop the price a bit.  If you used a lower grade whiskey I’m sure it could drop the price quite a bit, and in a drink like this you’d probably not be able to tell the difference, but then it wouldn’t be Jack Daniels Down Home Punch.

Both Tiffany and I like to eat healthy, experiment and find ways we can remove calories and unnecessary carbs. In that category it is a big nod to the home made concoction.  Low calorie and alcohol are at odds with each other, there is no way to have calorie free alcohol, but you can reduce the mixers calories pretty easily.  Make your own sour mix with artificial sweetener (or purchase sugar free sour mix), low cal OJ, sugar free Grenadine, and diet soda and you drastically cut the calories from sugar in this drink.

The other nice thing about making it yourself is it just tastes better, I don’t know if it’s the taste of pride from making it, using fresher ingredients or what, but we tried the bottled version next to the home made punch and you can tell they are the same beverage but the bottled one tastes less complex and flavorful in comparison.

Regarding this drink in general, it’s light, fruity and refreshing, you can’t really tell there is Jack Daniels in it which is great for people who don’t really like Jack Daniels.  I tend to enjoy small batch bourbon’s served neat or on the rocks so this is way too sweet for my palette but the few times I’ve tried one it’s enjoyable, just too sweet to drink regularly.I haven’t tried it yet but I’m quite sure you could use a cheaper whiskey and you’d never be able to tell the difference, I also think vodka would work well making a cheaper, lighter version of this punch and it would be a cousin to Sex on the Beach. Tiffany really enjoys this drink, they are fun to make and I highly recommend giving it a shot if you’re looking for a new fruity drink to try – cheers!