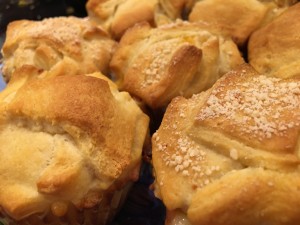
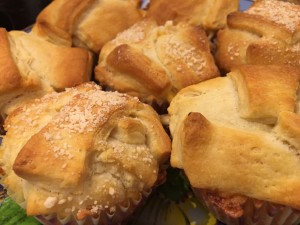
Archive / Snacks

RSS feed for this section

Pizza Muffins

Pizza Muffin

What you’ll need:

One can crescent rolls

2 cups of shredded cheese (I used a mozzarella cheddar blend)

8 oz of spaghetti sauce

One TB butter

one non-stick muffin pan

Servings 4 (2 pizza muffins per person)

Pizza Muffin

Step 1:  Heat Oven to 350 degrees.

Step 2: Remove crescent rolls from package and cut each triangle (there are 8 per package) into about 12 pieces.  Each triangle cut up will make one muffin.  Set these aside.

Step 3: Time to start assembling your muffin.  Put about six pieces (half) of your cutup crescent triangle into one of your muffin cups.  (Don’t do what I did and use paper muffin liners.  Even though crescent rolls are very buttery, they will still partially stick to the liners. Use a non-stick muffin pan or grease the cups with cooking spray or butter).  When placing the crescent pieces, make sure they cover the bottom and part of the sides.  You are basically creating the bottom cup.

Step 4: Put about a tablespoon of cheese on top of the crescent pieces in the cup.

Step 5:  Place about a teaspoon of sauce on top of the cheese you just placed in the cup. (If you want to add any pre-cooked meat or vegetables to your pizza muffin, do that here as well)

Step 6: Place one additional tablespoon of cheese over your sauce (and meat and/or vegetables if you added them).  Having the cheese on both sides helps adhere the dough from your crescent pieces in place.

Step 7: Finally, top your muffin by placing the remaining pieces of cut up crescent from one triangle on the cheese you just placed in your muffin cup.

Step 8: Repeat this until you have made 8 pizza muffin cups with crescent pieces, cheese, and sauce.

Step 9: Melt your tablespoon of butter and lightly brush it over the tops of your muffins.  You can add a sprinkle of parmesan cheese, garlic powder, or other desired seasonings at this time if you would like.
Step 10: Bake for 30 minutes.

Pizza muffin

Pizza Muffin Pizza Muffin

Now, you have a super tasty pizza muffin that is fun for parties, kids, or the kid in you 🙂


Chocolate Pretzel Buttons

Ever since the first bite of a chocolate covered pretzel, I have been in love!  These simple, yet nice looking chocolate covered pretzels are actually fairly quick and easy to make.  They also, are very versatile.  By buying themed M&Ms for whichever holiday it may be, or by going to their website and making special ones with your initials, baby’s name etc, you can personalize these treats for any event.

Cherry Thumbprint cookies and Chocolate Pretzel Buttons

Cherry Thumbprint cookies and Chocolate Pretzel Buttons

Ingredients:

2 bags of Hershey’s Hugs

1 bag of Snyder’s of Hanover Pretzels,  Butter snap

1 large bag of M&Ms Milk Chocolate Candy’s


  1. Turn oven to 200 degrees.
  2. Cover a baking sheet or cookie sheet in parchment paper.
  3. Unwrap all the Hershey’s Hugs and set them aside in a bowl.
  4. Lay out the pretzels one layer deep over the parchment paper on the baking sheet.
  5. Place a hug in the center of each pretzel.

    Hugs on Pretzels

    Hugs on Pretzels

  6. Place baking sheet with the pretzels and hugs into the oven for about 5 minutes.  You just want to melt the chocolate enough without them oozing all over.  You will see the hugs looking shiny and just starting to lose shape.  This is when you want to pull them out of the oven.
  7. Immediately after removing the pretzels and hugs from the oven, you want to carefully press an M&M into the center of each hug.  This is the most time consuming part and where you need to be most careful.
  8. Let your buttons cool for 15-20 minutes and then you can enjoy a fun snack!

    Chocolate Pretzel Buttons

    Chocolate Pretzel Buttons

Kernel Season’s Popcorn Spritzer – Review

In a previous post John shared his secret to make Perfect Popped Popcorn, it is a very good method to make a healthy, low cost snack.  For the longest time I didn’t like popcorn, but lately I’ve been a ravenous popcorn addict, sneaking a small pot here and there just to get me by until I could make a big pot.  It has become my favorite snack in a hurry.

I like my popcorn with butter and salt, both of which are not known for being healthy.  Well I think I’ve solved the butter problem.  Enter Kernel Season’s Popcorn Spritzer!  I saw this in the popcorn section of our grocery store when I was gathering kernel’s to feed my addiction but I ignored it, thinking it would taste chemically, artificial or just bad.  In a day of weakness I picked up a bottle to try when my craving was at it’s peak.  Below is the product you are looking for in all of it’s splendor.

kernel seasons popcorn spritzer

I came home and made a small batch just to test this spritzer out, I didn’t know what to expect.  It was FANTASTIC!!!  The flavor is very close to real butter without the fat, calories and cholesterol.  No chemically, funny or otherwise displeasing taste or smell.  It is “lighter” is the best way I can explain it, it doesn’t have the dense feel butter leaves on popcorn.

I really enjoy the aerosol concept of applying it, it just seems like a good idea to me.  However that is one drawback, it seems to have too much propellent and comes out almost violently.  They suggest doing short bursts, which I agree with but I wish it was a gentler misting style discharge than an aggressive mist.  My other complaint would be that it does leave your fingers greasy and I don’t like that.  I’m not entirely sure about if this increases or decreases salt/seasoning adhesion or not.  They claim it does, however I notice a lot of loose salt on the bottom and sides of the bowl.  This could be the seasoning/salt adhering to the overspray on the bowl but it seems fairly loose.  Whatever the case it’s not enough of a short coming for me to have it disuade my usage.

I’ll stress the technique mentioned in John’s post about using fine salt.  We have the Perfex Salt and Pepper Mills which allow the user to control the size of the grind, from powder to whole peppercorns or sea salt crystals falling out as you turn the handle.  While these are expensive, I’ll certainly admit that, they are the last salt and pepper mill you will ever buy.  If you’re purchasing special salt this will pay for itself quickly and you can use it for other cooking as well and who doesn’t love cool cooking toys!  If you have to John’s food processor method is a good substitute, but I prefer sea salt/kosher salt to iodized salt, it has a mellower flavor and is more forgiving.

On the salt/seasoning front I’m going to continue testing the seasonings I find and report back with any findings worth sharing.  I’m also looking into salt substitutes, but so far they all taste “off” but I remain optimistic that I’ll find a way to make this a healthy snack!

Any suggestions of toppings I should try?  Lets take popcorn to the next level!

Oster Beef Jerky Kit – Review

Oster Beef Jerky Kit

For Christmas last year I received several very nice presents from someone close to me who knows how much I love to entertain and prepare foods. One of those presents was an Oster Beef Jerky Kit.

On the box it states this device will allow you to “Make Jerky at Home with Ease.” The kit includes a Large Jerky Press with Trigger, 3 tips for a variety of sizes, and 5 Jerky Seasoning and Cure Packets. I suspect there may have been an ulterior motive with this present since the giver and I go camping together.

Dehydrator

After borrowing a food dehydrator for the purpose, I finally decided to try my hand at making my own jerky. The instructions were very straightforward and the kit has everything needed to make jerky except for the meat.

An advantage to making jerky using the press is that you use ground meat rather than purchasing whole pieces and slicing them. This makes the process both easier and less expensive plus the seasonings permeate the meat without having to wait for it to marinate.

Jerky Seasoning

The process is very straightforward. Simply blend the ground meat with the ingredients in the seasoning packet (spices and cure), load the meat into the press, select the tip you want, and squeeze. The ‘soon to be’ jerky is extruded out the end in the shape you have determined, whether it is narrow or wide strips, or a round stick.

Jerky Press and Tips

I recommend extruding right onto the dehydrator trays to minimize handling. Making a nicely shaped piece of jerky takes some skill which for me I think may take some time. It requires a steady hand and careful moving of the press as the meat comes out the end.

When the plunger in the press is extended to its farthest point there will still be enough meat in the tip to make more jerky. At this point you can disassemble the press and force it out of the tip manually. Or simply remove the meat from the press, roll or pat it with your hands into the desired shape, and place on the dehydrator tray.

Extruding the Jerky

Stack the trays in the dehydrator, plug it in, and let it do its work. Depending on the dehydrator, the thickness of the meat, and the amount of moisture needing to be extracted, the drying process can take from 4 hours to overnight.

Check the instructions on your dehydrator for the manufacturer’s recommendations and safe food handling information which will vary depending upon which type of ground meat you are using.

Beef Jerky

For this jerky I used lean ground beef, although you can use any kind of ground meat. Just make sure you are familiar with safe food handling practices for the kind of meat you are using as some require heating the jerky to a certain temperature even after drying and refrigerating until serving. For the batch of jerky sticks I added 1/2 teaspoon of cayenne pepper to the seasoning to give it an extra ‘kick.’

You don’t have to limit yourself to the seasoning packets available through Oster. After doing some research you can experiment with your own seasoning combinations. However, I can’t stress this enough – make sure you are aware of and observe safe food handling practices for the type of meat you are using.

Spicy Beef Sticks

Buying jerky can be very expensive and making it the conventional way can be difficult, time consuming, and costly. I found using the Oster Beef Jerky Kit for making my own jerky to be easy, quick, and inexpensive. As far as quality in comparison to packaged jerky purchased from the store, I found the jerky made using this method to be comparable.

You might expect jerky made from ground meat to be crumbly and unstable, but this process actually produces jerky of much the same texture as that cut from solid pieces of meat. For anyone who loves to eat jerky, and is willing to put in a little effort to save a significant amount of money, I highly recommend the Oster Beef Jerky Kit. It delivers what it promises by allowing you to  “Make Jerky at Home with Ease.”