Archive / Recipes

RSS feed for this section

All posts that contain a recipe

Cinnamon Rolls with Orange Cream Cheese Filling

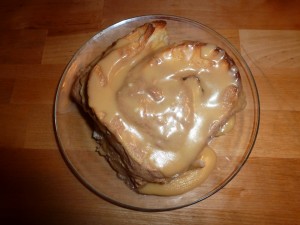
For me there is nothing quite like a freshly baked cinnamon roll first thing in the morning for breakfast with a freshly brewed cup of hot coffee. This recipe, with the addition of orange flavoring, adds a significant twist that I think you will find refreshing.

Orange Cream Cheese Cinnamon Rolls

Cinnamon Rolls with Orange Cream Cheese Filling

Ingredients
Dough
2 ¼ t Yeast
½ c Water, warm (110 degrees)
¼ c Sugar

½ c Milk, scalded
½ c Butter, melted
2 T Honey
1 t Salt, Kosher
2 Eggs

4 c Flour, bread

Filling
½ c Sugar, powdered
¼ c Sugar, brown
6 oz Cream cheese, at room temperature
½ c Butter, at room temperature
1 t Vanilla extract
2 T Orange juice reduction *
2 T Cinnamon, ground
¾ c Pecans, chopped

Glaze
4 T Butter (melted)
2 c Sugar, powdered
1 t Vanilla extract
2 T Orange juice reduction *
3 to 6 T Hot water

Instructions
In a small bowl, dissolve yeast and sugar in warm water and set aside.

In a large bowl mix milk, sugar, melted butter, salt and eggs. Add 2 cups of flour and mix until smooth.

Add yeast mixture. Mix in remaining flour until dough is easy to handle. Knead dough on lightly floured surface for 5 to 10 minutes. Place in well-greased bowl, cover and let rise until doubled in size, usually 1 to 1 ½ hours.

TIP: To facilitate the rising of the dough, place a cup of water in the microwave on high and bring the water to a boil. Immediately remove the boiling water from the microwave and place the bowl with the dough in the microwave uncovered. Check the dough after one hour. If necessary, repeat the process, but only leaving the dough in the microwave for an additional ½ hour. Do not turn the microwave on while the dough is inside. The purpose of this process is to provide the moist, warm environment that is perfect for the yeast to do its work causing the dough to rise.

After the dough has doubled in size roll out on a floured surface into a 10 x 15 inch rectangle.

Spread the filling evenly over the rolled out dough, leaving an inch at the bottom uncovered. Sprinkle with chopped walnuts, pecans, or raisins if desired.

Beginning at the 10 inch side, roll up dough and pinch edge together to seal. With a very sharp knife cut into 8 slices.

Coat the bottom of two baking pans with butter and place cinnamon roll slices close together in the pan and place in the cold oven.

Heat oven to 350 degrees F.

Bake for about 30 minutes or until nicely browned.

Meanwhile, mix together the glaze ingredients adding hot water 1 tablespoon at a time until the glaze reaches the desired consistency. Drizzle over slightly cooled rolls.

Orange Cream Cheese Cinnamon Rolls Pan

* To make the orange juice reduction, place 1 cup orange juice and ¼ cup sugar in a pan. Bring to boil then reduce heat to simmer and cook until liquid has been reduced to ¼ cup (8 tablespoons).

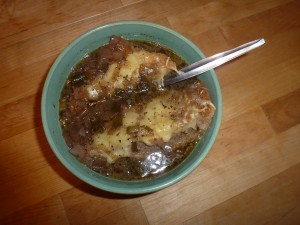
French Red Onion Soup

This is a delightful twist to a popular soup dish that is delicious, quick, easy, and inexpensive to make. The red and sweet bulb onions offer a flavor and presentation that add a new dimension to classic French Onion Soup which I think you will enjoy.

Although onions and onion soups were enjoyed by the ancient Greeks and Romans, the oldest reference I could find for French Onion Soup is from 1651: “Potage of onion. Cut your onions into very thin slices, fry them with butter, and after they are fried put them into a pot with water or with pease broth. After they are well sod, put in it a crust of bread and let it boile a very little; you may put some capers in it. Dry your bread then stove it; take up, and serve with one drop of vinegar.” —The French Cook, Francois Pierre La Varenne, [1651] Englished by I.D.G. 1653, Introduced by Philip and Mary Hyman [Southover Press:East Sussex] 2001 (p. 130)

The word “soup” comes from the word “sop.” Sop, because previous generations did not have the availability of utensils we have today, so bread was the means used to eat the soup by “sopping” it in the liquid.

Bon Appétit

French Red Onion Soup

French Red Onion Soup

Ingredients
1 Red onion, medium
1 Sweet bulb onion
4 T Butter

4 c Beef broth

1 T Balsamic vinegar
1 T Worcestershire sauce
½ t Tarragon, dried
¾ t Pepper, ground
Salt to taste

1 loaf French bread
Olive Oil
Garlic, minced
Parsley, dried
Gruyere or Swiss cheese, freshly grated

Instructions
Chop onions and sauté in butter until soft and caramelized (browned). Do not add salt until after this point else you will end up with wilted onions.

Add broth, vinegar, Worcestershire Sauce, dried tarragon, and pepper. Bring to a boil then simmer for 15 – 20 minutes.

Slice bread lengthwise and then into pieces that will fit in your soup bowls and place on baking pan.

Mince garlic and blend with olive oil. Brush olive oil and garlic blend on each bread face then sprinkle with dried parsley. Broil until bread begins to brown.

Grate cheese and sprinkle over bread slices. Then return pan to oven under the broiler until the cheese melts.

Place a slice of bread in each bowl and ladle soup over it.

Serve immediately.

Oster Beef Jerky Kit – Review

Oster Beef Jerky Kit

For Christmas last year I received several very nice presents from someone close to me who knows how much I love to entertain and prepare foods. One of those presents was an Oster Beef Jerky Kit.

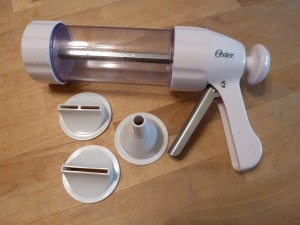
On the box it states this device will allow you to “Make Jerky at Home with Ease.” The kit includes a Large Jerky Press with Trigger, 3 tips for a variety of sizes, and 5 Jerky Seasoning and Cure Packets. I suspect there may have been an ulterior motive with this present since the giver and I go camping together.

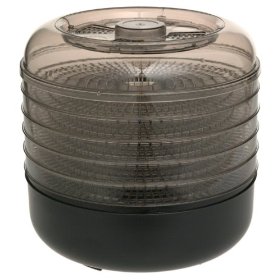
Dehydrator

After borrowing a food dehydrator for the purpose, I finally decided to try my hand at making my own jerky. The instructions were very straightforward and the kit has everything needed to make jerky except for the meat.

An advantage to making jerky using the press is that you use ground meat rather than purchasing whole pieces and slicing them. This makes the process both easier and less expensive plus the seasonings permeate the meat without having to wait for it to marinate.

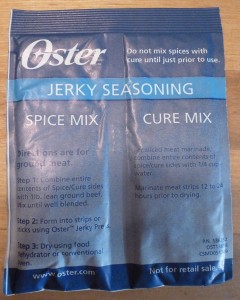
Jerky Seasoning

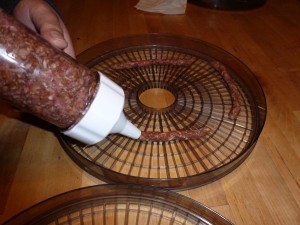
The process is very straightforward. Simply blend the ground meat with the ingredients in the seasoning packet (spices and cure), load the meat into the press, select the tip you want, and squeeze. The ‘soon to be’ jerky is extruded out the end in the shape you have determined, whether it is narrow or wide strips, or a round stick.

Jerky Press and Tips

I recommend extruding right onto the dehydrator trays to minimize handling. Making a nicely shaped piece of jerky takes some skill which for me I think may take some time. It requires a steady hand and careful moving of the press as the meat comes out the end.

When the plunger in the press is extended to its farthest point there will still be enough meat in the tip to make more jerky. At this point you can disassemble the press and force it out of the tip manually. Or simply remove the meat from the press, roll or pat it with your hands into the desired shape, and place on the dehydrator tray.

Extruding the Jerky

Stack the trays in the dehydrator, plug it in, and let it do its work. Depending on the dehydrator, the thickness of the meat, and the amount of moisture needing to be extracted, the drying process can take from 4 hours to overnight.

Check the instructions on your dehydrator for the manufacturer’s recommendations and safe food handling information which will vary depending upon which type of ground meat you are using.

Beef Jerky

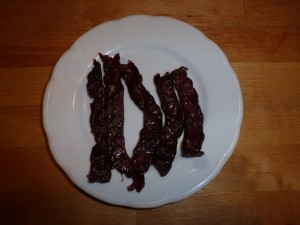
For this jerky I used lean ground beef, although you can use any kind of ground meat. Just make sure you are familiar with safe food handling practices for the kind of meat you are using as some require heating the jerky to a certain temperature even after drying and refrigerating until serving. For the batch of jerky sticks I added 1/2 teaspoon of cayenne pepper to the seasoning to give it an extra ‘kick.’

You don’t have to limit yourself to the seasoning packets available through Oster. After doing some research you can experiment with your own seasoning combinations. However, I can’t stress this enough – make sure you are aware of and observe safe food handling practices for the type of meat you are using.

Spicy Beef Sticks

Buying jerky can be very expensive and making it the conventional way can be difficult, time consuming, and costly. I found using the Oster Beef Jerky Kit for making my own jerky to be easy, quick, and inexpensive. As far as quality in comparison to packaged jerky purchased from the store, I found the jerky made using this method to be comparable.

You might expect jerky made from ground meat to be crumbly and unstable, but this process actually produces jerky of much the same texture as that cut from solid pieces of meat. For anyone who loves to eat jerky, and is willing to put in a little effort to save a significant amount of money, I highly recommend the Oster Beef Jerky Kit. It delivers what it promises by allowing you to  “Make Jerky at Home with Ease.”

Creamy Parmesan and Bacon Cauliflower Soup

I have had a head of cauliflower staring at me in my refrigerator ever since I bought it a few weeks ago to add to some pickled vegetables. After adding all the other ingredients to the pickles, I ran out of room for the cauliflower so it was sent into storage.

Of course fresh produce can’t sit around for very long before its quality starts to degrade, it goes bad and eventually has to be discarded. This is something I try to avoid, so either I only purchase fresh produce if I have a specific use planned for it, or come up with a use in a relatively short period of time.

I happened to be working from home today, and it is a little chilly outside, so some fresh hot soup sounded really good.

Creamy Parmesan and Bacon Cauliflower Soup

Here is the recipe I put together for Cauliflower soup that I think you will really enjoy. In my household is a particularly finicky eater who told me they LOVED it! I hope you do too.

Creamy Parmesan and Bacon Cauliflower Soup

Ingredients
4 T Butter

1 small Onion, yellow diced
2 small Carrot, thinly sliced
2 stalk Celery, thinly sliced
1 Sweet bulb onion, diced
1 head Cauliflower coarsely chopped

2 qts Chicken broth

4 slices Bacon, thickly sliced
6 T Flour
2 c Milk
1 c Cream
1 c Parmesan cheese

1 T Salt, Kosher
1 T Pepper, ground

Sour Cream, room temperature

Instructions
In a large soup pot or Dutch oven, melt 4 tablespoons butter. Add the diced onion and cook until it becomes translucent. Then add the carrots, celery & sweet bulb onion and cook until tender.

Add cauliflower, cover and cook over low heat for 15 minutes.

Pour in chicken broth, bring to a boil, then reduce heat and allow to simmer for 15 minutes.

In a large saucepan cook bacon until crispy. Remove bacon, reserving bacon fat. Add enough butter to the bacon fat in the pan to make 4 tablespoons total fat. Add flour and combine.

Add milk & cream and whisk until thick and smooth. Mix in Parmesan cheese.

Crumble the bacon and add to the soup along with this mixture and the salt & pepper.

Cook on medium until fully heated.

Pour into bowls and serve with a spoonful of sour cream on top.